
How to: Replacing Delta Rudder Control Lines
- Patrick

- May 7
- 4 min read
A step by step guide with pictures for replacing the rudder control lines (also called rudder haul lines) on a Delta Kayak

Rudder control lines, also called rudder haul lines, allow a paddler to raise and lower the rudder while seated in the kayak. If yours are fraying or have broken, they should be replaced to keep your kayak functioning as it should. This guide covers how to replace the lines on a Delta Kayak, but may work for other manufacturers as well. The basic principal for how the lines work applies to most rudder systems. Variation is usually how the lines are run through the rudder/rudder block.
Materials Needed

Scissors
Needle nose pliers (helpful for untying knots or threading in tight spaces)
Lighter
Step #1 - Remove old line

If your line is still mostly intact you may not need this how to--just follow the old line with the new. Start by snipping the knot by the parallel beads. It should be tucked in the bead, be sure you're cutting the control cord and not the bungee (stretchy line).
Unthread the old cord back to the rudder body.
Step #2 - Start threading new line
Start threading the new line into the tube closest to the cockpit of the kayak (where you sit). Push the cord into the tube until it pokes out back by the rudder.
Once you can see the cord poking out, you can pull what you need through the tube from the back.
Tip: tie the end of the line by the cockpit to the parallel bead so you can't accidentally pull the line into the kayak

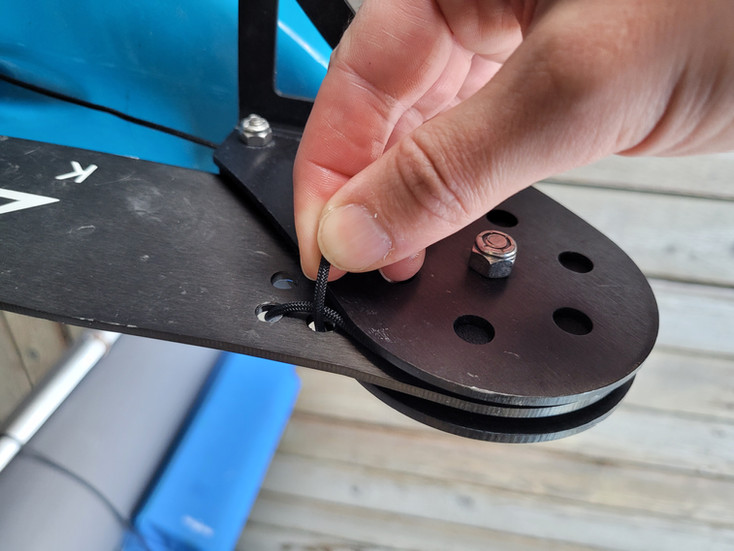
Step #3 - Run cord through the rudder block


Start by pushing the line into the hole on the same side of the kayaks as the line exited through the rudder block. The line should come out the back of the rudder block, under the rudder discs.
Step #4 - First pass through the rudder
Before starting to pass the cord through the rudder blade, pull approximately half of the cord though the kayak.
Pull the cord around the rudder disks--be sure to stay on the same side of the rudder blade as you started on.
Pass the line through the rudder blade as shown in the picture. Pull through all the loose cord.

Step #5 - Second pass through the rudder


Pass the line back through the rudder as shown in the photos. Pull all the loose cord through the rudder.
Step #6 - Third and final pass through the rudder
Pass the line back through the rudder as shown in the photo. Pull all the loose line through the rudder so everything snugs up nicely.

Step # 7 - Back through the rudder block


Put the rudder into the down position as shown in the first photo.
Bring the line over the rudder disk, keeping to the same side as you start on as seen in the second photo.
Thread the line through the rudder block through the hole shown in picture 3.
Step #8 - Back through the kayak
Start threading the line back into the kayak.
If you've done everything correctly, the line should exit the rudder block on the same side as the hole it needs to pass through the kayak.
Keep feeding the line in from the rudder side until you see it pop out by the cockpit. Once it does you can pull the line from that side.

Step #9 - Attaching to the parallel beads

Gently pull on one of the lines to determine if it will pull the rudder up.
The line that pulls the rudder up should be the one on the outside of the kayak, or furthest from the cockpit. Temporarily tie that line to the corresponding parallel bead so that it is further towards the back of the kayak--approximately 2" from where the line exits the kayak.
Now tie the inner line to the corresponding parallel bead so that it is further forward--approximately 2" behind the black pad eye as shown in the photo.
Step #10 - Testing and tuning
Test the lines by pulling the bead that is farther back forward to raise and lower the rudder. Make sure that neither bead touches the pad eye or where the line enters the kayak when the rudder is raised and lowered. Move where the temporary knots are tied if needed.
Step #11 - Knot tying


With the location of the knots finalized, tie a double overhand knot and trim off excess. Use a lighter to burn the end (so it won't fray) and tuck the knot into the parallel bead. Repeat for both cords.
Finished!

And with that, you're done. Be sure to periodically check the lines for fraying, especially where they enter and leave the stern on the kayak. It's much easier to replace if you have the old lines still intact. Happy Paddling!


Comments